This page contains instruction on how to make your own 'glow-in-the-dark' poi, using a led powered colour changing light. It took me approximately 3 hours to make including stopping to take pictures for these instructions.
Materials you need

- Two colour changing led lights - £1.50 each
I found Zolo Colour Change LED Ball White at B&Q. They are soft enough not to hurt too much when you hit yourself and are really cheap. - Laundry bag - Less than £1 (I bought 3 for € 2)
Also know as mesh washing machine bags, I made four pouches from a single 27x33cm (10.6"x13") bag. - Two pieces of webbing 28x2.5cm (11"x1") each - I used left over pieces (thanks mum!) buy for less than £0.50 per meter
Dimensions are approximate, use wider or thinner webbing to your preference. I think you should be ok with anything over 25cm (10") long each - Two metal split rings diameter 2.5cm (1") - Free from my mums odds and sods jar. Buy for +/- £0.10 each
Diameter depends on thickness off webbing used. - 3mm cord approximately 3 meters (10') in length - € 1.75 for 20 meters (65')
Again you can use thinner or thicker stuff. Depending on how long you want your poi 3 meter should be long enough - Two drawstring stoppers - Mine came with the laundry bags
Total cost for a pair of poi are around £3 - £7 depending on what you already have lying around.
Tools you need
- Sewing machine (optional can use needle if sewn by hand)
- Scissors
- Safety pin (optional)
- Printer (optional)
Create the pouches
Initially I created square pouches for the led balls. However, this didn't look too nice. In my final version I created rounded pouches.
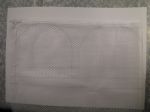
My laundry bags fitted two led lights side by side. I marked the outline on the bag and stitched the pencilled line.
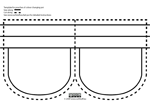 Download the template of the pouches.
- Place the template underneath the laundry bag and trace it. If your laundry bag already has a cord casing: re-use it by re-positioning the template!
- I left the fabric of the laundry bag doubled up, simply sewing each of the two pouches.
- I then cut out the two pouches and created the cord casing.
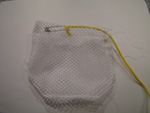
Thread cord through pouches
- Use the safety-pin to thread the rope through the cord casings.
- Cut the cord roughly to length. The cord will be doubled up over the whole length.
- Add the stopper over the two ends of cord.
- Fit the poi into the pouch and close it with the stopper.
- Repeat for the second one.

Create the finger grips
- The finger grips are a single piece of webbing.
- Take one of the two 28cm (11") long piece of webbing.
- Fold the webbing double once.
- Fold the ends into the piece again. Leave a little space for the split ring to go through later.
- Sew two lines across the finger grips. Make sure to double / triple / quadruple the seems for extra strength.
- Repeat for the other pair of finger grips.

Putting it all together
Do the following for both poi:
- Open the split rings and thread it through the end of the finger grips.
- Tie the cord onto the split ring.

Finished poi

 See my photo website for some more action pictures.